my e-mailaddress


zaterdag 31 januari 2015

Tussendoor / In between


Ik heb niet veel te laten zien, maar ik ben wel druk aan het bouwen aan mijn kippenhok. Dus even een korte stand van zaken over de vloer van het hok, alhoewel, zeg maar gerust kippenkasteel ;)!  
De vloer is ook gemaakt van foamboard, wat enerzijds is beplakt met dun lichtbruin karton. Maar bij nader inzien heb ik als vloer toch maar de andere kant (met grijs karton) gebruikt, want die was voorzien van een opstaand (hout)randje.
Ik wil namelijk dat de vloer uit het kippenhok gehaald kan worden, zodat ik er steeds in kan om er verschillende scenes in te kunnen fotograferen.

I haven't much to show you now, but I’m still busy with building my hen house. So, just a brief update about the floor of the hen house, although you might even say chickens castle ;)! 
The floor is also made of foam board, which is covered on one side with thin light brown cardboard. But on second thoughts I've chosen as the upper side of the floor, the other side (the one with the gray card board), because it also has a raised (wooden) edge.
I wants the floor can be removed from the chicken coop, so that I can photograph different scenes in the henhouse.


Omdat het opstaande randje zo kaal leek, heb ik het beplakt met de rest van de ‘baksteentjes’ en dit keer ook met bovenkanten van de bakstenen, zodat de rand een soort van 3D effect krijgt. Eigenlijk is dit soort ouderwetse kippenhokken in het echt ook gebouwd op een bakstenen onderrand en het heeft een betonvloer.

Because the raised edge seemed so bare, I have glued the leftovers of the 'bricks' on it. This time I've cut the top for the bricks, they're made of the same sandpaper that I used for the rest.  Actually in RL this old fashioned hen house has a concrete floor and it is also build on an edge of bricks, so now the raised edge of my miniatuur hen house gets a sort of 3D effect.


Hier zie je het randje rondom beplakt met bakstenen en behalve wat vuiligheid, is de vloer nu klaar.

Here you see the raised edge with the new upper side on the bricks and except for the filth, the floor is ready now.


Het volgende geduldkarweitje is het dak: er komen Oud-Hollandse dakpannen op het dak. Ik ben er al mee 
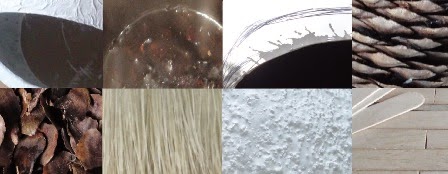
begonnen, maar het vraagt enorm veel tijd. Uit stroken van 3 cm breed dun oranje karton snij ik de 2 cm brede dakpnnen. Elke dakpan krijgt een laagje acrylverf, gemengd uit 5 kleuren verf, waarna ze goed moeten drogen en ik hetzelfde proces nog twee keer moet herhalen. De eerste 6 dakpannen die klaar zijn, kun je linksboven zien liggen op het keukenpapier. Op die manier moet ik er nog ruim 150 maken :S! 
Dus voor dit weekend betekent het dat ik nog wel even 'onder de panne' ben :D!
Allemaal een fijn weekend gewenst!

The next chore requires lots of patience, because that's the roof: there will be old Dutch roof tiles on the roof. First I've cut strips of thin bright orange cardboard, then I've cut them in pieces of 2 x 3 cm. Then I'll paint them one by one, it is very time consuming. Each tile get a first layer of acrylic paint, mixed of 5 colors of paint (diluted with water), allow them to dry well and then I'll have to repeat the same process twice. The first six roof tiles are ready, you can see them drying on kitchen paper at the left upper corner. That way I'll still have to make about 150 roof tiles :S !! 
So, for this weekend I’ll be quite busy :D!
I wish you all a nice weekend!

Ilona

maandag 26 januari 2015

Wit en groen / White and green


Voor het eerst heb ik foamboard (3 mm dik) gebruikt om iets te maken in miniatuur: mijn kippenhok. Dit materiaal vraagt om nogal wat creatieve oplossingen, vooral om het zo te kunnen bewerken dat het resultaat naar mijn zin is. Nadat ik een begin had gemaakt, besloot ik om alle vier de wanden apart te maken, zodat ik het kippenhok daarna in elkaar kan zetten, een soort prefab woning....voor kipjes ;)!

For the very first time I’ve used foam board (3 mm thick) to make something in miniature: my hen house. This material asks for creative solutions, especially to edit it, for getting the result that I want. After I’ve made a start, I decided to make all of the four walls separately, so that after they are finished, I can put the hen house together, like a sort of prefab house....for chickens ;)!


Na het uitsnijden van ramen en deur, plakte ik de randen met gemetselde bakstenen onderaan op elk van de muren.  Toen was al duidelijk dat de muren krom gingen staan….:S
Ik heb dat probleempje opgelost door aan beide zijden dun gekleurd karton (grijs buiten en binnenin lichtbruin) te plakken en dat werkte prima: de muren trokken vanzelf weer recht :D!

After cutting out the windows and the door, I’ve glued the edges of brickwork at the bottom side of each of the walls. After that it was clear to me that the walls warped….:S
I’ve solved this problem by gluing thin colored cardboard (grey on the outside and light brown on the inside) at both sides of the walls and it worked out well: the walls were straight again :D! 


Ik heb lichtbruin karton gekozen voor de binnenkant van het kippenhok, want dan hoef ik het niet te beplakken met hout, anders wordt het gebouw alsnog zo zwaar en daarom had ik nu juist voor foamboard gekozen J! Nadat ik het bewerkt had met een dun laagje gesso, opgebracht met een varkensharen kwast en snel uitgestreken, heb ik het goed laten drogen. Daarna heb ik de ‘planken’ erin gekerfd en er barsten van hout in gekerfd met mijn hobby mes.

I’ve chosen for the light brown card board, because I than don’t need to glue wood strips on the inside of the hen house. Than the building will get too much in weight and that was exactly the reason why I did choose for foam board J! After I had painted a quick thin layer of gesso with a bristle brush, I've let dry the layer of gesso very well. Then I’ve carved the pattern of shelves in the card board with my hobby knife.


Hierna waren de 'planken' voor de buitenkant van het kippenhok aan de beurt, dit zijn gesneden repen dun grijs karton. Na het snijden heb ik ze geschilderd in het zogenaamde boerengroen, hiervoor heb ik lukraak 2 blauwe en 2 groene kleuren verf gebruikt.

After this was done I’ve cut some strips of thin grey colored card board for making 'shelves' for the exterior of the hen house. After the cutting was done I painted them in the color ‘boerengroen’ (this is a special green colored paint, which was used by Dutch farmers in earlier times). To mix this paint I’ve used 2 blue and 2 green colors and with these colors I randomly painted the card board strips.


Dus: binnenkant fris witgeschilderd……………………….voorlopig, het is een kippenhok, duh ;)! De buitenkant in boerengroene verf, dat al behoorlijk verschoten is door de zon, waardoor de verf altijd blauwachtig lijkt. Blauwe verf wordt gebruikt om deze speciale kleur groen te verkrijgen en hier kun je dus het blauw in de groene kleur er doorheen zien schijnen ;)!

So: the inside is crispy white…………….for the time being, it’s a hen house ;)! The exterior is painted in a 'farmers' green color, which is already quite faded by the sun, this way the green paint always looks bluish. Blue paint is used for mixing this special green color and here you can see that this blue paint shines through the green color ;)!


Omdat de muren toch nog wat krom gingen trekken door het gebruik van lijm en verf, heb ik besloten om toch een houten geraamte aan de binnenkant te lijmen. Het gebouwtje werd er ook wat steviger van en het lijkt zo net op het geraamte, waarmee je normaal gesproken een kippenhok bouwt.

Because the walls still warped a bit after using glue and paint, I still decided to make a wooden frame at the inside. That way the building is a bit sturdier and it just looks like a wooden frame, which you normally would use for building a hen house.


Even ‘droog’ passen, zo staat het kippenhok er nu bij………tja, er is nog veel werk te doen ;)!
Just a ‘dry’ fit, this is how the hen house looks now.......there still has to be done a lot of work  ;)!


Een vooruitblik op wat komen gaat: vuiligheid ;O! Dus van tevoren heb ik alvast even een raampje opengezet voor wat frisse lucht, iew :D!!
Ik wens jullie allemaal een fijne week!

A preview for what is coming next: filth ;O! So in advance I’ve opened one of the windows to let in some fresh air, phew :D!
I wish you all a nice week!

Ilona

dinsdag 20 januari 2015

Tok, tok, tok / Cluck, cluck, cluck


……zegt de kip!
……says the hen!

Wat  ben ik nu eigenlijk aan het bouwen in miniatuur? Nou, het is een kippenhok! En dan niet een ‘gewoon’ kippenhok, maar eentje die specifiek is voor deze streek. Zo een stond er ook in de jaren ’50 bij mijn grootouders boerderij op het erf.

What am I actually building in miniature? Well, it's a hen house! And it’s not just an ‘ordinary’ one, but a hen house that is specific to this region. One of them was standing on the farm yard of the farm of my grandparents in the 50ies.


Hier is de voorkant met de ramen te zien, excuus voor de wat wazige foto, het is ontzettend donker weer. Als alle gevels klaar zijn, zal ik uitleggen hoe ik dat gedaan heb in een ander blogbericht.

This is the front gable with the windows, sorry for the blurry picture, it’s very dark weather here. When all facades are finished I’ll explain to you how I’ve made them in a next blog post.


Omdat ik dit weekend jarig ben geweest en heb ik niet zoveel tijd gehad om maar iets te kunnen doen aan het kippenhok. Vandaag heb ik de ramen afgemaakt, geschilderd en in de voorgevel gelijmd.

Last weekend I have celebrated my birthday, so I couldn't work at the hen house. Today I’ve finished the windows, I've painted them and than glued them in the front wall.


Op deze foto is beter te zien hoe ik de scharnieren heb gemaakt, van de metalen tube voetcrème en een messing spijkertje.

This picture shows much better how I’ve made the hinges of the metal tube of foot cream and a small brass  nail.


Gelijmd met secondenlijm boven op het raam, dat nu geopend kan worden.
Glued with super glue on the top of the window, which now can be opened.


En hier is het raam in het kozijn op zijn plaats geplakt.
And here you can see it glued in place in the window frame.


De binnenkant kreeg extra latten om het raam, zodat de kippetjes niet op de tocht zullen zitten ;)!
On the inside the windows got some extra wooden slats, so that the hens won’t sit in a draught ;)!


Het hele hok wordt geschilderd met witkalk tegen bloedmijt, deze parasiet schijnt funest te zijn voor kippen, heb ik me laten vertellen. Deze foto is genomen aan het eind van deze donkere middag, vandaar de slechte kwaliteit.

The whole hen house will be painted with whitewash against blood mites, one says that this parasite seem to be disastrous for chickens. This picture has been taken at the end of this dark afternoon, hence the poor quality.


Zoals gezegd had ik afgelopen weekend veel verjaardagsvisite, dus was het hier in huis een flink ‘gekakel’ :D!! Mijn miniatuur kippenhok daarentegen heeft gelukkig maar twee inwoners, dus is het er nog heerlijk rustig ;O.
De prachtkip vooraan bij het luikje is gemaakt door Patricia, van www.woolytalesminiatures.blogspot.com 
Warm welkom aan mijn nieuwe volgers en jullie bedankt voor de fijne reacties.
Ik wens jullie een fijne week!

As I said, last weekend I had lots of visitors for my birthday, so it was quite a lot of ‘cackling’ here in my house :D! On the other hand, my miniature hen house fortunately has just two residents, so it’s still nicely quiet ;O.
The gorgeous chicken at the small entrance hatch has been made by Patricia, of www.woolytalesminiatures.blogspot.com  
A warm welcome to my new followers and thank you all for your nice comments.
I wish you all a nice week!

Ilona

dinsdag 13 januari 2015

Voetencrème / Foot cream


Een poosje terug zag ik op een van mijn wandelingen deze oude dame achter haar rollator voor mij op het pad lopen en omdat ik aan mijn miniatuur omaatje moest denken, heb ik gauw een foto van haar krulspelden gemaakt  ;)! Deze dingen zie je nog steeds op het platteland, mooi toch ;)!

 A while ago on one of my walkings I saw this old woman walking with her rollator in front of me on the foot path and because I thought of my miniature grandma I quickly took a picture of her curlers ;)! These things are still to be seen on the countryside, I love it ;)!

En omdat ik veel wandel zorg ik goed voor mijn voeten………..dus verwen ik ze af en toe met een fijne voetencrème. Deze crème zit in een mooie tube, die ik gebruik voor mijn hobby, dat zul je straks wel zien :D!

And because I love walking I take good care for my feet……so, now and than I like to spoil them with a nice foot cream. This cream comes in a nice metal tube, which I use it for my hobby, you will see it later on :D!


Wat heb ik de afgelopen week gedaan aan mini's? Niet zo veel, maar ik wil het toch laten zien. Eerst heb ik nog een paar stroken karton van ongeveer 60 cm met schuurpapieren baksteentjes beplakt, wat een werk, maar ik vind het resultaat wel mooi.

What have I done in miniature in the past week? Actually I haven’t done much, but still I want to show it to you. First of all I've cut lots more small bricks, out of the sandpaper and I've glued them on strips of thin card board of about 60 cm long. A lot of work, but I like the result.


Verder heb ik een raam gemaakt van passe-partout karton, waartussen ik een dun plastic sheet (0,15 mm dik) heb geplakt. Ik heb dit al een poos in huis en ik kan me niet herinneren waar ik het ooit gekocht heb, sorry.

I also made a window of matboard, where between I've glued a sheet of plastic. I’ve this plastic sheet (0,15 mm thick) since a while and I can’t remember where I’ve ever bought it, I’m sorry.


Omdat ik het bovenste raam wil laten open gaan, heb ik scharnieren gemaakt van het metaal van de tube voetcrème. Ik knip deze tube open en ontvet het metaal heel goed, anders plakt het niet. Na het afschuren van de verf op de tube kun je het op maat knippen voor scharnieren. Ik vouw het metaal om een de punt van een prikpen en knijp de uiteinden goed dicht, daarna lijm ik ze tussen de twee lagen passe-partout karton van het raam met UHU (alles-lijm).

I want a window of which the upper window can be opened, so I’ve made hinges of the metal of the tube of foot cream. I've cut open this tube and I've degrease the metal very well, otherwise it won’t stuck with glue to the matboard. After sanding off the paint of the metal tube you can cut it in length for hinges. I fold the metal strip around a prick pen (I don’t know if this is the right English word?) and I squeeze the ends firmly together, after that I glue them between the two layers of matboard of the window with UHU glue (for all purposes).


Hier zie je de scharnieren op hun plaats, meer daarover in een volgende blogpost.
Omdat ik (voor het eerst) met foamboard aan het werk ben, heb ik op de snijranden een strip van dun hout gelijmd om daar later het kozijn op te kunnen bevestigen.

Here you can see the hinges in place, more about that later in another blog post.
I’m working (for the first time) with foamboard, so I’ve glued some thin strips of wood on the cutting edges, for placing the window frames later on.


Ik heb voor het schilderwerk, wat nu heel ruw moet worden gedaan, een oud kwastje gebruikt. Met dit kwastje had ik hier en daar het schuurpapier beschilderd, waardoor het helemaal afgesleten was. Ik gooi weinig dingen weg, want je weet maar nooit en nu was het prima te gebruiken :D!!

For the paint work, which now had to be done roughly, I’ve used a small old paint brush. With this brush I’d painted the sandpaper here and there, whereby the brush was worn off. I don't like to throw away much things, because you never know if you can use it and now it was very useful :D!


Hier zie je de ‘verweerde’ verf, die nog veel meer oud gemaakt moet worden.
Here you can see the ‘weathered’ paint, which still has to be much more weathered.

Ik ga eens lekker zitten met de voetjes omhoog, ik wens jullie een fijne week :D!
I’ll go and sit down with my feet up, I wish you a nice week :D!

Ilona

donderdag 8 januari 2015

Frisse start / Fresh start

Na al die drukke feestdagen ben ik dan eindelijk weer begonnen met nieuwe miniaturen te maken :D!
                                         

Now the Christmas holidays are over I've finally made a start with making new miniatures :D!


Voor één van de dingen, die ik op mijn to-do lijstje heb staan, heb ik een oud verweerd stenen muurtje nodig. Na lang nadenken ben ik begonnen met het knippen van kleine baksteentjes uit een rol schuurpapier, wat ik onlangs heb gevonden bij de Action. Ik koos voor dit schuurpapier vanwege de kleur ;O.

For one of the new things on my to-do list, I do need a old weathered brick wall. After a lot of thinking I’ve started cutting out small bricks out of a roll of sanding paper, which I’ve bought at the Action-shop (cheap supermarket in The Netherlands, Belgium, Germany and France). I've chosen this sanding paper because of its color ;O.


Na een poosje kwam ik erachter dat ik de verkeerde maat in mijn hoofd had! Ik knipte steentjes van 4 mm hoog en 8 mm breed, wat natuurlijk 15 mm breed moest zijn.

After a while I discovered that I was busy with cutting the wrong size! I cut small stones of 4 mm high and 8 mm wide, this had to be 15 mm wide of course!


Hier kun je het verschil goed zien. Daarna schoot het werk ook veel beter op, hahaha!
Here you can see the difference. After that, you can see that the work progressed much faster, hahaha!


Het knippen en opplakken van steentjes op dun grijs karton en het bijkleuren met acrylverf kostte me aardig wat tijd. Dit heb ik tot nu toe in twee dagen kunnen doen. Het zal nog heel wat van mijn tijd gaan kosten, vermoed ik...... ♪♫♪♫

The cutting and glueing of these brick stones on thin grey cardboard and the coloring with acrylic paint will cost me quite some time. This is what I’ve done in two days. I think it will cost quite some more of my time....... ♪♫♪♫


Weten jullie nog dat ik in november met een geheimpje bezig was? Nou, het zal nog een poosje geheim blijven, want het was voor iemand anders. Inmiddels is het veilig bij haar aangekomen, waarschijnlijk zal ze het op haar blog laten zien....als het er de tijd voor is ;)!

In November I was busy with a secret chore, do you remember? Well, it seems that it will be secret for a bit longer, because it was made for someone else. In the meantime it safely arrived at her home and probably she will show it on her blog....if it's the time for it ;)!


De eerste sneeuwklokjes in mijn tuin gaan bloeien, deze zijn voor jullie, fijn weekend allemaal :D!
The first snowdrops in my garden are in bloom, these are for you, have a nice weekend :D!

Ilona